Life of a Packet in Kubernetes — Part 1
Kubernetes cluster networking can be more than a bit confusing, even for engineers with hands-on experience working with virtual networks and request routing. This article will help to understand the fundamental Kubernetes networking. The initial plan was to deep dive into Kubernetes networking’s complexities by following the journey of an HTTP request to a service running on a Kubernetes cluster. However, the life of a packet will not be complete without namespaces, CNI, and calico. We will start with Linux networking and cover other topics later.
This article is already too long, therefore divided the topics into several parts to ensure we give each topic time.
Topics — Part 1
- Linux namespaces
- Container networking
- What is CNI?
- Pod network namespace
Link: This article.
Topics — Part 2
- Calico CNI
Link: Life of a Packet in Kubernetes — Part 2
Topics — Part 3
- Pod-to-Pod
- Pod-to-External
- Pod-to-Service
- External-to-Pod
- External Traffic Policy
- Kube-Proxy
- iptable rules processing flow
- Network Policy basics
Link: Life of a Packet in Kubernetes — Part 3
Topics — Part 4
- Ingress Controller
- Ingress Resources Example
- Nginx
- Envoy+Contour
- Ingress with MetalLB
Link: Life of a Packet in Kubernetes — Part 4
Topics — Part 5
- ISTIO service mesh
Link: Life of a Packet in ISTIO — Part 1
Linux Namespaces
Linux namespaces comprise some of the fundamental technologies behind most modern-day container implementations. At a high level, they allow for the isolation of global system resources between independent processes. For example, the PID namespace isolates the process ID number space. This means that two processes running on the same host can have the same PID!
This level of isolation is clearly useful in the world of containers. Without namespaces, a process running in container A could, for example, umount an important filesystem in container B, or change the hostname of container C, or remove a network interface from container D. By namespacing these resources, the process in container A isn’t even aware that the processes in containers B, C, and D exist.
- Mount — isolate filesystem mount points
- UTS — isolate hostname and domain name
- IPC — isolate interprocess communication (IPC) resources
- PID — isolate the PID number space
- Network — isolate network interfaces
- User — isolate UID/GID number spaces
- Cgroup — isolate cgroup root directory
Most container implementations make use of the above namespaces in order to provide the highest level of isolation between separate container processes. Although note that the cgroup namespace is slightly more recent than the others and isn’t as widely used.

Container Networking (Network Namespace)
Before we jump into understanding the various options provided by CNI and Docker, let’s explore the core technology that powers container networking. The Linux kernel has various features that have been developed to provide multi-tenancy on hosts. Namespaces provide functionality that offers different kinds of isolation, with network namespace being the one that provides network isolation.
It’s very easy to create network namespaces using the ip command in any Linux operating system. Let’s create two different network namespaces and name them as client and server.
master# ip netns add client
master# ip netns add server
master# ip netns list
server
client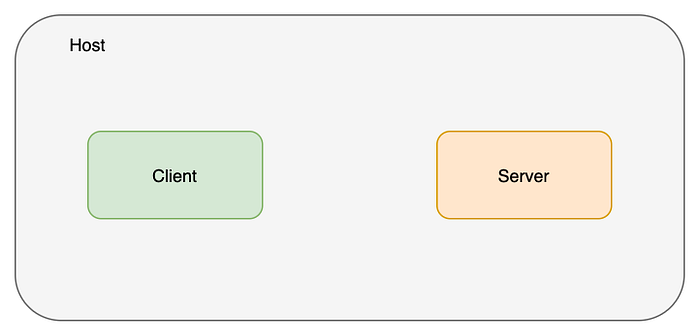
Create a veth pair to connect these network namespaces. Think of a veth pair as a network cable with connectors at both ends.
master# ip link add veth-client type veth peer name veth-server
master# ip link list | grep veth
4: veth-server@veth-client: <BROADCAST,MULTICAST,M-DOWN> mtu 1500 qdisc noop state DOWN mode DEFAULT group default qlen 1000
5: veth-client@veth-server: <BROADCAST,MULTICAST,M-DOWN> mtu 1500 qdisc noop state DOWN mode DEFAULT group default qlen 1000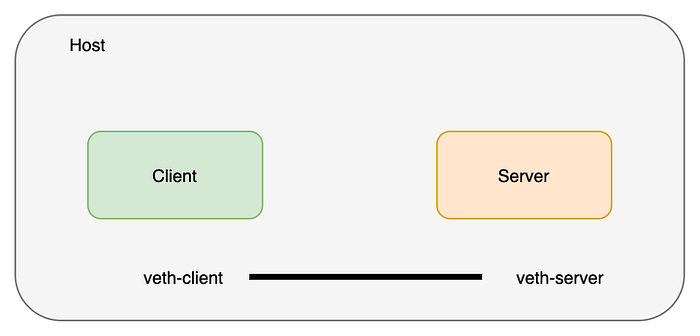
The veth pair (cable) exists on the host network namespace; Now let’s move the two ends of the veth pair to their respective namespaces that we created earlier.
master# ip link set veth-client netns client
master# ip link set veth-server netns server
master# ip link list | grep veth # doesn’t exist on the host network namespace now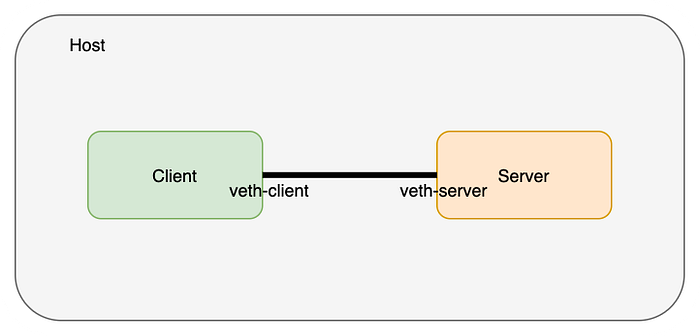
Let’s verify the veth ends actually exist in the namespaces. We’ll start with the client namespace
master# ip netns exec client ip link
1: lo: <LOOPBACK> mtu 65536 qdisc noop state DOWN mode DEFAULT group default qlen 1
    link/loopback 00:00:00:00:00:00 brd 00:00:00:00:00:00
5: veth-client@if4: <BROADCAST,MULTICAST> mtu 1500 qdisc noop state DOWN mode DEFAULT group default qlen 1000
    link/ether ca:e8:30:2e:f9:d2 brd ff:ff:ff:ff:ff:ff link-netnsid 1
Now let’s check the server namespace
master# ip netns exec server ip link
1: lo: <LOOPBACK> mtu 65536 qdisc noop state DOWN mode DEFAULT group default qlen 1
    link/loopback 00:00:00:00:00:00 brd 00:00:00:00:00:00
4: veth-server@if5: <BROADCAST,MULTICAST> mtu 1500 qdisc noop state DOWN mode DEFAULT group default qlen 1000
    link/ether 42:96:f0:ae:f0:c5 brd ff:ff:ff:ff:ff:ff link-netnsid 0
Now let’s assign IP addresses to these interfaces and bring them up
master# ip netns exec client ip address add 10.0.0.11/24 dev veth-client
master# ip netns exec client ip link set veth-client up
master# ip netns exec server ip address add 10.0.0.12/24 dev veth-server
master# ip netns exec server ip link set veth-server up
master#
master# ip netns exec client ip addr
1: lo: <LOOPBACK> mtu 65536 qdisc noop state DOWN group default qlen 1
    link/loopback 00:00:00:00:00:00 brd 00:00:00:00:00:00
5: veth-client@if4: <BROADCAST,MULTICAST,UP,LOWER_UP> mtu 1500 qdisc noqueue state UP group default qlen 1000
    link/ether ca:e8:30:2e:f9:d2 brd ff:ff:ff:ff:ff:ff link-netnsid 1
    inet 10.0.0.11/24 scope global veth-client
       valid_lft forever preferred_lft forever
    inet6 fe80::c8e8:30ff:fe2e:f9d2/64 scope link
       valid_lft forever preferred_lft forever
master#
master# ip netns exec server ip addr
1: lo: <LOOPBACK> mtu 65536 qdisc noop state DOWN group default qlen 1
    link/loopback 00:00:00:00:00:00 brd 00:00:00:00:00:00
4: veth-server@if5: <BROADCAST,MULTICAST,UP,LOWER_UP> mtu 1500 qdisc noqueue state UP group default qlen 1000
    link/ether 42:96:f0:ae:f0:c5 brd ff:ff:ff:ff:ff:ff link-netnsid 0
    inet 10.0.0.12/24 scope global veth-server
       valid_lft forever preferred_lft forever
    inet6 fe80::4096:f0ff:feae:f0c5/64 scope link
       valid_lft forever preferred_lft forever
master#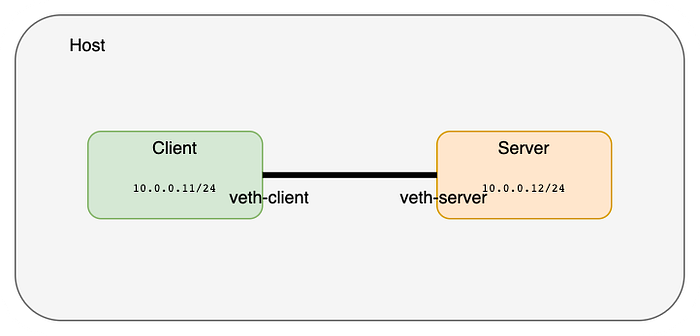
Using the ping command, we can verify the two network namespaces have been connected and are reachable,
master# ip netns exec client ping 10.0.0.12
PING 10.0.0.12 (10.0.0.12) 56(84) bytes of data.
64 bytes from 10.0.0.12: icmp_seq=1 ttl=64 time=0.101 ms
64 bytes from 10.0.0.12: icmp_seq=2 ttl=64 time=0.072 ms
64 bytes from 10.0.0.12: icmp_seq=3 ttl=64 time=0.084 ms
64 bytes from 10.0.0.12: icmp_seq=4 ttl=64 time=0.077 ms
64 bytes from 10.0.0.12: icmp_seq=5 ttl=64 time=0.079 ms
If we would like to create more network namespaces and connect them together, it might not be a scalable solution to create a veth pair for every combination of namespaces. Instead, one can create a Linux bridge and hook up these network namespaces to the bridge to get connectivity. And that’s exactly how Docker sets up networking between containers running on the same host!
Let’s create namespaces and attach the same to the bridge.
# All in one
BR=bridge1
HOST_IP=172.17.0.33ip link add client1-veth type veth peer name client1-veth-br
ip link add server1-veth type veth peer name server1-veth-br
ip link add $BR type bridge
ip netns add client1
ip netns add server1
ip link set client1-veth netns client1
ip link set server1-veth netns server1
ip link set client1-veth-br master $BR
ip link set server1-veth-br master $BR
ip link set $BR up
ip link set client1-veth-br up
ip link set server1-veth-br up
ip netns exec client1 ip link set client1-veth up
ip netns exec server1 ip link set server1-veth up
ip netns exec client1 ip addr add 172.30.0.11/24 dev client1-veth
ip netns exec server1 ip addr add 172.30.0.12/24 dev server1-veth
ip netns exec client1 ping 172.30.0.12 -c 5
ip addr add 172.30.0.1/24 dev $BR
ip netns exec client1 ping 172.30.0.12 -c 5
ip netns exec client1 ping 172.30.0.1 -c 5
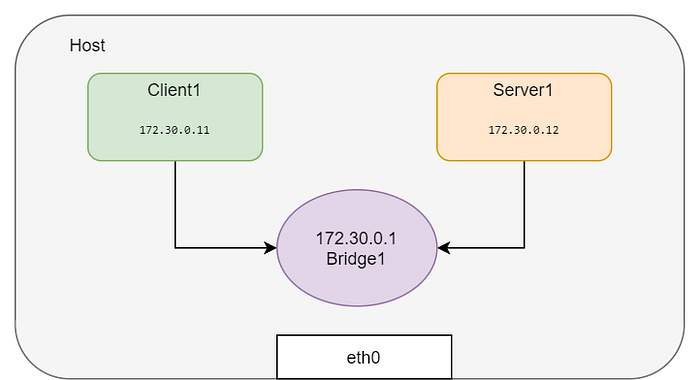
Using the ping command, we can verify the two network namespaces have been connected and are reachable,
controlplane $ ip netns exec client1 ping 172.30.0.12 -c 5
PING 172.30.0.12 (172.30.0.12) 56(84) bytes of data.
64 bytes from 172.30.0.12: icmp_seq=1 ttl=64 time=0.138 ms
64 bytes from 172.30.0.12: icmp_seq=2 ttl=64 time=0.091 ms
64 bytes from 172.30.0.12: icmp_seq=3 ttl=64 time=0.073 ms
64 bytes from 172.30.0.12: icmp_seq=4 ttl=64 time=0.070 ms
64 bytes from 172.30.0.12: icmp_seq=5 ttl=64 time=0.107 ms
Let’s ping the HOST_IP from the namespace,
controlplane $ ip netns exec client1 ping $HOST_IP -c 2
connect: Network is unreachable
Yes, ‘Network is unreachable’ because there is no route configured in the newly created namespaces. Let’s add the default route,
controlplane $ ip netns exec client1 ip route add default via 172.30.0.1
controlplane $ ip netns exec server1 ip route add default via 172.30.0.1
controlplane $ ip netns exec client1 ping $HOST_IP -c 5
PING 172.17.0.23 (172.17.0.23) 56(84) bytes of data.
64 bytes from 172.17.0.23: icmp_seq=1 ttl=64 time=0.053 ms
64 bytes from 172.17.0.23: icmp_seq=2 ttl=64 time=0.121 ms
64 bytes from 172.17.0.23: icmp_seq=3 ttl=64 time=0.078 ms
64 bytes from 172.17.0.23: icmp_seq=4 ttl=64 time=0.129 ms
64 bytes from 172.17.0.23: icmp_seq=5 ttl=64 time=0.119 ms--- 172.17.0.23 ping statistics ---
5 packets transmitted, 5 received, 0% packet loss, time 3999ms
rtt min/avg/max/mdev = 0.053/0.100/0.129/0.029 ms
Now the ‘default’ route to reach the external network is the bridge, hence the namespaces can consume any external network services,
controlplane $ ping 8.8.8.8 -c 2
PING 8.8.8.8 (8.8.8.8) 56(84) bytes of data.
64 bytes from 8.8.8.8: icmp_seq=1 ttl=117 time=3.40 ms
64 bytes from 8.8.8.8: icmp_seq=2 ttl=117 time=3.81 ms--- 8.8.8.8 ping statistics ---
2 packets transmitted, 2 received, 0% packet loss, time 1001ms
rtt min/avg/max/mdev = 3.403/3.610/3.817/0.207 ms
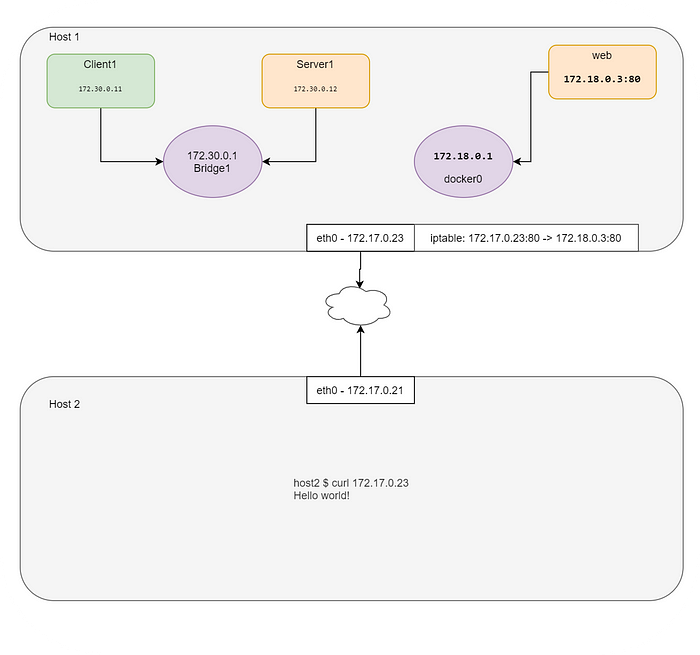
How to reach the private network from external servers?
As you can see, the machine we’re demoing on already have Docker installed, which has led to the creation of the docker0 bridge. It’s not easy to run a webserver from a network namespace context as all the Linux namespaces should interwork to simulate that scenario. Let’s use the Docker to simulate the scenario.
docker0   Link encap:Ethernet  HWaddr 02:42:e2:44:07:39
          inet addr:172.18.0.1  Bcast:172.18.0.255  Mask:255.255.255.0
          UP BROADCAST MULTICAST  MTU:1500  Metric:1
          RX packets:0 errors:0 dropped:0 overruns:0 frame:0
          TX packets:0 errors:0 dropped:0 overruns:0 carrier:0
          collisions:0 txqueuelen:0
          RX bytes:0 (0.0 B)  TX bytes:0 (0.0 B)
Let’s spin up an Nginx container now and inspect the same.
controlplane $ docker run -d --name web --rm nginx
efff2d2c98f94671f69cddc5cc88bb7a0a5a2ea15dc3c98d911e39bf2764a556
controlplane $ WEB_IP=`docker inspect -f "{{ .NetworkSettings.IPAddress }}" web`
controlplane $ docker inspect web --format '{{ .NetworkSettings.SandboxKey }}'
/var/run/docker/netns/c009f2a4be71
Since Docker doesn’t create the netns in the default location, ip netns list doesn’t show this network namespace. We can create a symlink to the expected location to overcome that limitation.
controlplane $ container_id=web
controlplane $ container_netns=$(docker inspect ${container_id} --format '{{ .NetworkSettings.SandboxKey }}')
controlplane $ mkdir -p /var/run/netns
controlplane $ rm -f /var/run/netns/${container_id}
controlplane $ ln -sv ${container_netns} /var/run/netns/${container_id}
'/var/run/netns/web' -> '/var/run/docker/netns/c009f2a4be71'
controlplane $ ip netns list
web (id: 3)
server1 (id: 1)
client1 (id: 0)
Let’s check the IP address in the web namespace,
controlplane $ ip netns exec web ip addr
1: lo: <LOOPBACK,UP,LOWER_UP> mtu 65536 qdisc noqueue state UNKNOWN group default qlen 1
    link/loopback 00:00:00:00:00:00 brd 00:00:00:00:00:00
    inet 127.0.0.1/8 scope host lo
       valid_lft forever preferred_lft forever
11: eth0@if12: <BROADCAST,MULTICAST,UP,LOWER_UP> mtu 1500 qdisc noqueue state UP group default
    link/ether 02:42:ac:12:00:03 brd ff:ff:ff:ff:ff:ff link-netnsid 0
    inet 172.18.0.3/24 brd 172.18.0.255 scope global eth0
       valid_lft forever preferred_lft forever
Let’s check the IP address in the docker container,
controlplane $ WEB_IP=`docker inspect -f "{{ .NetworkSettings.IPAddress }}" web`
controlplane $ echo $WEB_IP
172.18.0.3
It is very clear that the docker uses all the Linux namespaces and isolates things from the host. Let’s try to reach the WebApp that runs in the web network namespace from the HOST server.
controlplane $ curl $WEB_IP
<!DOCTYPE html>
<html>
<head>
<title>Welcome to nginx!</title>
<style>
    body {
        width: 35em;
        margin: 0 auto;
        font-family: Tahoma, Verdana, Arial, sans-serif;
    }
</style>
</head>
<body>
<h1>Welcome to nginx!</h1>
<p>If you see this page, the nginx web server is successfully installed and
working. Further configuration is required.</p><p>For online documentation and support please refer to
<a href="http://nginx.org/">nginx.org</a>.<br/>
Commercial support is available at
<a href="http://nginx.com/">nginx.com</a>.</p><p><em>Thank you for using nginx.</em></p>
</body>
</html>
Is it possible to reach this webserver from an external network? Yes, by adding port forwarding.
controlplane $ iptables -t nat -A PREROUTING -p tcp --dport 80 -j DNAT --to-destination $WEB_IP:80
controlplane $ echo $HOST_IP
172.17.0.23
Let’s try to reach the webserver using the HOST IP address.
node01 $ curl 172.17.0.23
<!DOCTYPE html>
<html>
<head>
<title>Welcome to nginx!</title>
<style>
    body {
        width: 35em;
        margin: 0 auto;
        font-family: Tahoma, Verdana, Arial, sans-serif;
    }
</style>
</head>
<body>
<h1>Welcome to nginx!</h1>
<p>If you see this page, the nginx web server is successfully installed and
working. Further configuration is required.</p><p>For online documentation and support please refer to
<a href="http://nginx.org/">nginx.org</a>.<br/>
Commercial support is available at
<a href="http://nginx.com/">nginx.com</a>.</p><p><em>Thank you for using nginx.</em></p>
</body>
</html>
node01 $
The CNI plugin executes the above commands (Not exactly, but similar) to set up the loopback interface, eth0, and assign the IP address to the container. The Container run time (i.e Kubernetes, PodMan, etc) makes use of CNIs to setup the POD network. Let’s discuss the CNI in the next section.
What is CNI?
“A CNI plugin is responsible for inserting a network interface into the container network namespace (e.g. one end of a veth pair) and making any necessary changes on the host (e.g. attaching the other end of the veth into a bridge). It should then assign the IP to the interface and setup the routes consistent with the IP Address Management section by invoking the appropriate IPAM plugin.”
Wait, Looks familiar? Yes, we have seen this in the “Container Networking” section.
CNI (Container Network Interface), a Cloud Native Computing Foundation project, consists of a specification and libraries for writing plugins to configure network interfaces in Linux containers, along with a number of supported plugins. CNI concerns itself only with network connectivity of containers and removing allocated resources when the container is deleted. Because of this focus, CNI has a wide range of support and the specification is simple to implement.
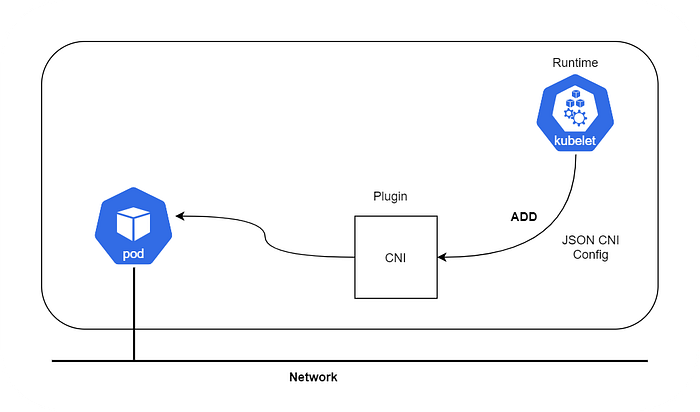
Note: The runtime can be anything — i.e Kubernetes, PodMan, cloud foundry, etc
Detailed CNI Specification
https://github.com/containernetworking/cni/blob/master/SPEC.md
Here are a couple of points I found interesting during my first read-through…
- The spec defines a container as being a Linux network namespace. We should be comfortable with that definition as container runtimes like Docker create a new network namespace for each container.
- Network definitions for CNI are stored as JSON files.
- The network definitions are streamed to the plugin through STDIN; i.e there are no configuration files sitting on the host for the network configuration.
- Other arguments are passed to the plugin via environmental variables
- A CNI plugin is implemented as an executable.
- The CNI plugin is responsible for wiring up the container. i.e it needs to do all the work to get the container on the network. In Docker, this would include connecting the container network namespace back to the host somehow.
- The CNI plugin is responsible for IPAM which includes IP address assignment and installing any required routes.
Let’s try to simulate the Pod creation manually without Kubernetes and assign IP via CNI plugin instead of using too many CLI commands. At end of this demo, you will understand what is a Pod in Kubernetes.
Step1: Download the CNI plugins.
controlplane $ mkdir cni
controlplane $ cd cni
controlplane $ curl -O -L https://github.com/containernetworking/cni/releases/download/v0.4.0/cni-amd64-v0.4.0.tgz
  % Total    % Received % Xferd  Average Speed   Time    Time     Time  Current
                                 Dload  Upload   Total   Spent    Left  Speed
100   644  100   644    0     0   1934      0 --:--:-- --:--:-- --:--:--  1933
100 15.3M  100 15.3M    0     0   233k      0  0:01:07  0:01:07 --:--:--  104k
controlplane $ tar -xvf cni-amd64-v0.4.0.tgz
./
./macvlan
./dhcp
./loopback
./ptp
./ipvlan
./bridge
./tuning
./noop
./host-local
./cnitool
./flannel
controlplane $
Step 2: Create a CNI configuration in a JSON format.
cat > /tmp/00-demo.conf <<"EOF"
{
    "cniVersion": "0.2.0",
    "name": "demo_br",
    "type": "bridge",
    "bridge": "cni_net0",
    "isGateway": true,
    "ipMasq": true,
    "ipam": {
        "type": "host-local",
        "subnet": "10.0.10.0/24",
        "routes": [
            { "dst": "0.0.0.0/0" },
            { "dst": "1.1.1.1/32", "gw":"10.0.10.1"}
        ]
    }
}
EOF
CNI Configuration parameters,
-:CNI generic parameters:-cniVersion: The version of the CNI spec in which the definition works with
name: The network name
type: The name of the plugin you wish to use.  In this case, the actual name of the plugin executable
args: Optional additional parameters
ipMasq: Configure outbound masquerade (source NAT) for this network
ipam:
    type: The name of the IPAM plugin executable
    subnet: The subnet to allocate out of (this is actually part of the IPAM plugin)
    routes:
        dst: The subnet you wish to reach
        gw: The IP address of the next hop to reach the dst.  If not specified the default gateway for the subnet is assumed
dns:
    nameservers: A list of nameservers you wish to use with this network
    domain: The search domain to use for DNS requests
    search: A list of search domains
    options: A list of options to be passed to the receiver
Step 3: Create a container with a ‘none’ network so that the container won’t have any IP address to use. You can use any image for this container, however, I’m using the ‘pause’ container to mimic Kubernetes.
controlplane $ docker run --name pause_demo -d --rm --network none kubernetes/pause
Unable to find image 'kubernetes/pause:latest' locally
latest: Pulling from kubernetes/pause
4f4fb700ef54: Pull complete
b9c8ec465f6b: Pull complete
Digest: sha256:b31bfb4d0213f254d361e0079deaaebefa4f82ba7aa76ef82e90b4935ad5b105
Status: Downloaded newer image for kubernetes/pause:latest
763d3ef7d3e943907a1f01f01e13c7cb6c389b1a16857141e7eac0ac10a6fe82
controlplane $ container_id=pause_demo
controlplane $ container_netns=$(docker inspect ${container_id} --format '{{ .NetworkSettings.SandboxKey }}')
controlplane $ mkdir -p /var/run/netns
controlplane $ rm -f /var/run/netns/${container_id}
controlplane $ ln -sv ${container_netns} /var/run/netns/${container_id}
'/var/run/netns/pause_demo' -> '/var/run/docker/netns/0297681f79b5'
controlplane $ ip netns list
pause_demo
controlplane $ ip netns exec $container_id ifconfig
lo        Link encap:Local Loopback
          inet addr:127.0.0.1  Mask:255.0.0.0
          UP LOOPBACK RUNNING  MTU:65536  Metric:1
          RX packets:0 errors:0 dropped:0 overruns:0 frame:0
          TX packets:0 errors:0 dropped:0 overruns:0 carrier:0
          collisions:0 txqueuelen:1
          RX bytes:0 (0.0 B)  TX bytes:0 (0.0 B)
Step 4: Invoke the CNI plugin with the CNI configuration file.
controlplane $ CNI_CONTAINERID=$container_id CNI_IFNAME=eth10 CNI_COMMAND=ADD CNI_NETNS=/var/run/netns/$container_id CNI_PATH=`pwd` ./bridge </tmp/00-demo.conf
2020/10/17 17:32:37 Error retriving last reserved ip: Failed to retrieve last reserved ip: open /var/lib/cni/networks/demo_br/last_reserved_ip: no such file or directory
{
    "ip4": {
        "ip": "10.0.10.2/24",
        "gateway": "10.0.10.1",
        "routes": [
            {
                "dst": "0.0.0.0/0"
            },
            {
                "dst": "1.1.1.1/32",
                "gw": "10.0.10.1"
            }
        ]
    },
"dns": {}- CNI_COMMAND=ADD — Action (Available values: ADD/DEL/CHECK)
- CNI_CONTAINER=pause_demo — We’re telling CNI that the network namespace we want to work is called ‘pause_demo’
- CNI_NETNS=/var/run/netns/pause_demo— The path to the namespace in question
- CNI_IFNAME=eth10— The name of the interface we wish to use on the container side of the connection
- CNI_PATH=`pwd` — We always need to tell CNI where the plugin executables live. In this case, since we’re already in the ‘cni’ directory we just have the variable reference pwd (present working directory). You need the ticks around the command pwd for it to evaluate correctly. The formatting here seems to be removing them but they are in the command above correctly
I strongly recommend you to read the CNI specification to get more information about the plugin and their functions. You can use more than one plugin in the same JSON file to chain the actions; i.e add firewall rule etc.
step 5: Running the above command returns a couple of things. First — it returns an error since the IPAM driver can’t find the file it uses to store IP information locally. If we run this again for a different namespace, we wouldn’t get this error since the file is created the first time we run the plugin. The second thing we get is a JSON return indicating the relevant IP configuration that was configured by the plugin. In this case, the bridge itself should have received the IP address of 10.0.10.1/24 and the namespace interface would have received 10.0.10.2/24. It also added the default route and the 1.1.1.1/32 route that we defined in the network configuration JSON. Let’s check what it did,
controlplane $ ip netns exec pause_demo ifconfig
eth10     Link encap:Ethernet  HWaddr 0a:58:0a:00:0a:02
          inet addr:10.0.10.2  Bcast:0.0.0.0  Mask:255.255.255.0
          UP BROADCAST RUNNING MULTICAST  MTU:1500  Metric:1
          RX packets:18 errors:0 dropped:0 overruns:0 frame:0
          TX packets:0 errors:0 dropped:0 overruns:0 carrier:0
          collisions:0 txqueuelen:0
          RX bytes:1476 (1.4 KB)  TX bytes:0 (0.0 B)lo        Link encap:Local Loopback
          inet addr:127.0.0.1  Mask:255.0.0.0
          UP LOOPBACK RUNNING  MTU:65536  Metric:1
          RX packets:0 errors:0 dropped:0 overruns:0 frame:0
          TX packets:0 errors:0 dropped:0 overruns:0 carrier:0
          collisions:0 txqueuelen:1
          RX bytes:0 (0.0 B)  TX bytes:0 (0.0 B)controlplane $ ip netns exec pause_demo ip route
default via 10.0.10.1 dev eth10
1.1.1.1 via 10.0.10.1 dev eth10
10.0.10.0/24 dev eth10  proto kernel  scope link  src 10.0.10.2
controlplane $
CNI creates a bridge and configures it as per the configuration,
controlplane $ ifconfig
cni_net0  Link encap:Ethernet  HWaddr 0a:58:0a:00:0a:01
          inet addr:10.0.10.1  Bcast:0.0.0.0  Mask:255.255.255.0
          inet6 addr: fe80::c4a4:2dff:fe4b:aa1b/64 Scope:Link
          UP BROADCAST RUNNING MULTICAST  MTU:1500  Metric:1
          RX packets:7 errors:0 dropped:0 overruns:0 frame:0
          TX packets:20 errors:0 dropped:0 overruns:0 carrier:0
          collisions:0 txqueuelen:1000
          RX bytes:1174 (1.1 KB)  TX bytes:1545 (1.5 KB)
Step 6: Start a web server and share the ‘pause’ containers namespace.
controlplane $ docker run --name web_demo -d --rm --network container:$container_id nginx
8fadcf2925b779de6781b4215534b32231685b8515f998b2a66a3c7e38333e30
Step 7: Browse the web page using pause containers IP address
controlplane $ curl `cat /var/lib/cni/networks/demo_br/last_reserved_ip`
<!DOCTYPE html>
<html>
<head>
<title>Welcome to nginx!</title>
<style>
    body {
        width: 35em;
        margin: 0 auto;
        font-family: Tahoma, Verdana, Arial, sans-serif;
    }
</style>
</head>
<body>
<h1>Welcome to nginx!</h1>
<p>If you see this page, the nginx web server is successfully installed and
working. Further configuration is required.</p><p>For online documentation and support please refer to
<a href="http://nginx.org/">nginx.org</a>.<br/>
Commercial support is available at
<a href="http://nginx.com/">nginx.com</a>.</p><p><em>Thank you for using nginx.</em></p>
</body>
</html>
Now let’s see the definition of a Pod in the following section.
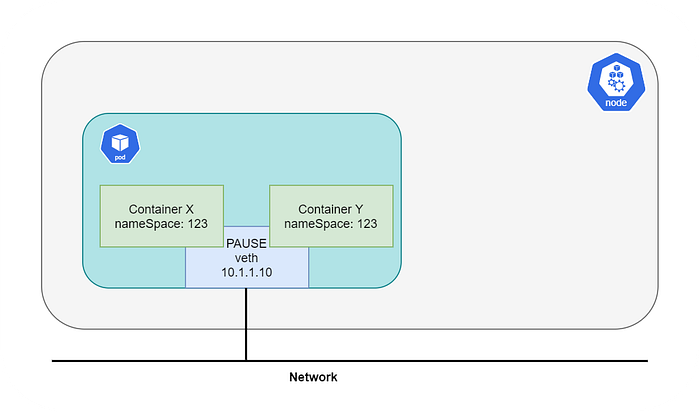
Pod Network Namespace
The first thing to understand in Kubernetes is that a POD is not actually the equivalent to a container, but is a collection of containers. And all these containers of the same collection share a network stack. Kubernetes manages that by setting up the network itself on the pause container, which you will find for every pod you create. All other containers attach to the network of the pause container which itself does nothing but provide the network. Therefore, it is also possible for one container to talk to a service in a different container, which is in the same definition of the same pod, via the localhost.
References:
https://man7.org/linux/man-pages/man7/namespaces.7.html
https://github.com/containernetworking/cni/blob/master/SPEC.md
https://github.com/containernetworking/cni/tree/master/cnitool
https://github.com/containernetworking/cni
https://tldp.org/HOWTO/BRIDGE-STP-HOWTO/set-up-the-bridge.html
https://kubernetes.io/
https://www.dasblinkenlichten.com/